Gelatin Bubbles Recipe
Introduction
Gelatin bubbles are a fun and creative way to add a unique touch to your desserts or parties. These delicate, colorful spheres are made by coating balloons with a thin layer of gelatin, then removing the balloon to leave a fragile, edible bubble. With a bit of patience, you can create impressive decorations that wow your guests.
Ingredients
- 6 Tbsp unflavored gelatin (56g)
- 3/4 cup cold water (180g)
- Gel food coloring
- 3 Tbsp shortening
- Paper towels (to wipe the shortening)
- Luster dust (optional)
Instructions
- Step 1: Partially inflate 30 small balloons, tying a knot high up at the neck to shape them into spheres. Optionally, tie each balloon to the end of a paper straw to make handling easier.
- Step 2: Coat each balloon with a thin, even layer of shortening using paper towels to avoid white streaks. The balloons should appear shiny and lightly greased to help later removal.
- Step 3: In a small heat-proof bowl, combine 3/4 cup cold water with 6 Tbsp unflavored gelatin. Swirl gently to hydrate the gelatin and let it bloom for a few minutes until firm.
- Step 4: Warm the gelatin mixture in the microwave for about 20 seconds until fluid but not hot to the touch.
- Step 5: Stir in gel food coloring and optional luster dust until fully dissolved. Remove any foam or bubbles on top to avoid cloudy surfaces on your bubbles.
- Step 6: Dip each balloon into the gelatin, rolling to cover most of the surface evenly. Shake off excess and place balloons upright on straws in a glass or rest on a cooling rack with the knot side down.
- Step 7: If the gelatin thickens during dipping, briefly heat it again in 10-second intervals to maintain the right consistency.
- Step 8: Repeat the dipping process for a second coat to strengthen and brighten the bubbles.
- Step 9: Let the balloons dry for about 12 hours or overnight. To speed drying, use a low-speed fan after 30 minutes of initial hardening, being careful not to blow the bubbles away.
- Step 10: Once hardened, gently puncture and deflate each balloon with scissors, then carefully remove it from the gelatin shell.
- Step 11: If bubbles collapse slightly, gently pop them back into shape—they are surprisingly sturdy.
- Step 12: Trim any jagged edges around the base with sharp scissors and use the gelatin bubbles as desired.
Tips & Variations
- Use gel food coloring for more vibrant and even coloring without affecting gelatin texture.
- Apply a thin layer of shortening carefully to prevent any lumps or streaks that affect bubble smoothness.
- Try using edible luster dust on the gelatin for a shimmering, magical effect.
- If you don’t have small balloons, look for water balloons or mini balloons designed for crafts.
Storage
Store gelatin bubbles in a cool, dry place away from direct sunlight to prevent melting or softening. They can last a few days if kept dry and intact. Avoid refrigeration or humid environments, as moisture will dissolve the gelatin. Handle gently to prevent breaking, and use promptly for best visual effect.
How to Serve
Serve this delicious recipe with your favorite sides.
FAQs
Can I make gelatin bubbles without balloons?
Balloons are recommended for shaping the bubbles because they create a smooth round form and are easy to remove. Alternative molds may be difficult to remove or could damage the gelatin shell.
Why are my gelatin bubbles cloudy or bubbly on the surface?
Foam or bubbles on the gelatin mixture cause cloudy spots. Be sure to carefully remove any foam before dipping balloons to achieve clear, smooth bubbles.
PrintGelatin Bubbles Recipe
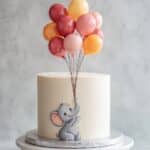
Create stunning, edible gelatin bubbles perfect for adding a whimsical touch to desserts and cocktails. These delicate spheres are crafted by coating balloons with flavored gelatin, then deflating the balloons to leave behind a hollow, shiny bubble surface that’s both surprising and elegant. Ideal for special occasions or creative presentations.
- Prep Time: 15 minutes
- Cook Time: 4 hours 25 minutes
- Total Time: 4 hours 40 minutes
- Yield: 30 gelatin bubbles 1x
- Category: Dessert Decoration
- Method: No-Cook
- Cuisine: International
- Diet: Vegetarian
Ingredients
Gelatin Mixture
- 6 Tbsp unflavored gelatin (56g)
- 3/4 cup cold water (180g)
- Gel food coloring (a few drops, optional)
- Luster dust (optional)
Preparation
- 3 Tbsp shortening
- Paper towels (for wiping shortening)
- 30 small balloons
Instructions
- Prepare the Balloons: Partially inflate 30 small balloons and tie a knot near the neck, shaping them into small spheres. Optionally, tie each balloon to a paper straw for easier handling during dipping and drying.
- Apply Shortening: Lightly coat each balloon with a thin, even layer of shortening using paper towels. The balloons should appear shiny without visible white streaks. This grease layer ensures easy removal of the balloons from the gelatin shell.
- Hydrate the Gelatin: In a heatproof bowl, add 3/4 cup cold water, then sprinkle 6 Tbsp unflavored gelatin evenly over it. Gently swirl to moisten all gelatin, then let sit for a few minutes to bloom fully.
- Heat the Gelatin: Microwave the gelatin mixture for about 20 seconds until warm and fluid but not hot. Stir well to dissolve completely. If needed, microwave in additional 10-second increments and stir until smooth and bubble-free.
- Add Color and Shine: Stir in gel food coloring and optional luster dust to tint and gently shimmer the gelatin. Remove any foam or bubbles on the surface carefully to avoid cloudy textures on the bubbles.
- First Dip: Gently dip each balloon into the gelatin, rotating to coat evenly with a thin layer. Shake off excess gelatin. Place balloons tied to straws upright in a heavy glass, or rest untied balloons tie-side down on a cooling rack to dry.
- Reheat Gelatin if Needed: If gelatin thickens before dipping all balloons, reheat for 10 seconds to restore fluidity.
- Second Dip: After all balloons are coated once, dip each a second time for added strength and vibrant color.
- Dry: Let the gelatin-coated balloons dry undisturbed for about 12 hours or overnight to fully harden. To accelerate drying, use a small fan on low speed after 30 minutes of resting; be cautious not to dislodge the bubbles.
- Pop and Remove Balloons: Carefully puncture the balloon with scissors and deflate it inside the hardened gelatin shell. Gently peel away the balloon without cracking the bubble.
- Fix Imperfections: If indentations appear, gently press them back into shape; the bubbles are sturdy and flexible.
- Trim Edges and Use: Use sharp scissors to trim any uneven or jagged edges around the bubble base. The gelatin bubbles are now ready to adorn desserts, drinks, or party displays.
Notes
- The shortening coat is essential to prevent the gelatin from sticking to the balloons.
- Be gentle when handling both while drying and when removing balloons to avoid cracking the delicate shells.
- Use a low-speed fan carefully to speed drying without blowing the bubbles away.
- The ratio of water to gelatin is critical; always use 2 parts water to 1 part gelatin by volume for optimal consistency.
- Gelatin bubbles can be made in various colors using gel food coloring for customized looks.
- Allowing the bubbles to fully harden overnight yields the best strength and clarity.
Keywords: gelatin bubbles, edible bubbles, dessert decoration, gelatin art, party dessert ideas, creative desserts, food presentation